You can use any of the bases with any of the connectors and any of the grip, holder or support ends.
Gridfinity Module as a Tentacle Base
You can use the Gridfinity tentacle base with any Gridfinity baseplate. The model name is “1×1 Tentacle Base”.
Or, you can use it with one of these standalone Gridfinity bases:
A Gridfinity Tentacle Base is works very well because the magnets keep your stand upright even if it is not balanced (until the magnets are overcome).


Non-Gridfinity Bases
There are a variety of other bases you can use for a tentacle support.
Three-leg base (Tribase)
Three angled legs lead up to a mounting ball. The three legs guarantee it will be stable even on uneven surfaces. It works great with the webcam holder, for example.

Large flat base
This large, flat base is formed from a grid of hexagons mainly to minimize the use of filament but also because it looks more interesting than a simple flat plate.

Glue-on base
This base has a smooth, round bottom you can glue onto something else, or attach adhesive velcro, etc. You could also use it in other models that need a base for connecting tentacle parts. But, there is also a .step file for just the ball and just the cup, specifically so you can include it in your models.


Magnetic base
This base holds twelve 6×2 neodymium magnets so you can attach this base to any steel surface. For example, it could hold a light against the inside of a computer case or a washing machine. Some keychain LED lights are incredibly bright, such as this one. And, it works great with the webcam holder.


Z-Topper base
This base fits into the hexagonal hole at the top of Z-axis on most Prusa printers. If you find it is too loose you can cut the edge of the small hexigon with a sharp knife, to deform the plastic a little and add friction to the fit. It is based on my Z-Topper Filament Cutter, which I use all the time.


Z-Rider base
This base fits into the oblong hexagonal hole on the side of the printed part that slides up and down the Z-axis and holds the X-axis belt’s freewheel side. It is based on the Z-Rider which I mainly use to move one of Schnippi‘s Kodamas up and down during my prints. For… reasons. Perhaps this could be a mount for a small webcam, but it would vibrate whenever the X axis moved.

Honeycomb Storage Wall Base
This base fits into a Honeycomb Storage Wall cell. This lets you bring the flexibilty and adaptability of the Tentacle System to your Honeycomb Storage Wall.

Skådis Base
This base hangs on an IKEA Skådis pegboard.

Large Binder Clip Tentacle Monster
This base secures to anything that a large binder clip can attach to. See Large Binder Clip Tentacle Monster below in connectors.
Tentacle Rail Clip Base
This base includes a clip that attaches to the T-Slots in the aluminum extrusions used in Prusa and other 3D printers. Used in combination with the camera holder, this allows you to position a webcam exactly where you want on either the side of the print bed.
This model includes several components than can be used or not, as needed. You can print more parts if you need them. You may also use any of the parts in the Connector Kit (below) as well.
If the vibration of the printer causes the camera to shift position, you might need to glue some of the connectors together.
This model includes a remix of the T-Slot Clip found in mkoistinen‘s Flexi-arm Camera Mount.


Screw-on Base
This simple model provides a base. You can screw it to the wall or any other surface using a panhead or drywall screw or other fastener with a chamfered or filleted underside.
It is extra thick and has a much denser infill to resist cracking, but do not over-tighten the fastener to avoid damaging the print.

Binder Clip Bases
You slide one of the metal handles of a binder clip into one of these bases so you can use the binder clip to hold onto anything that fits. Binder clips have a lot of closing force.
There is one model designed to hold a medium binder clip and a separate model designed for large binder clips.


Multiboard Base
This is a Multiboard snap that provides a Tentacle System base. It prints without supports.
This component lets you attach those ad hoc stands to a Multiboard.
This model incorporates the basic snap created by Keep Making, which can be found here.
You can learn all about the Multiboard system here: https://www.multiboard.io/


Zip Tie Bases
There are two different zip tie bases: one for cylinders that looks like a Y and one for other shapes that accepts zip ties in two orientations. They are all part of the Tentacle Zip Tie Kit. The bases are called Tentacle Ziptie Base and Tentacle Ziptie Minibase.

Octopus Base
This is a configurable base. Used in combination with the Connector Kit, you can build a durable base to hold up to eight tentacles.
There are two regular ball bases and six stumps that each end in a pin compatible with the Connector Kit.
The shape helps keep the center of gravity in a position to stabilize a longer tentacle. If necessary it is easy to add weight to the opposite side, for example with a series of washers or nuts slid over an extension, or attached to a magnetic grip.
You can arrange a collection of grips and rotate the entire base to bring the most useful ones into your workspace. You can pick up the entire collection by the head with a single hand to move or store it.
Googly eyes are optional, but recommended; however, they should be different sizes.
Bolt-on Base
This base attaches using 4mm hardware. The nut fits inside a slot and the bolt attaches to it through a hole in the bottom. The washer is optional. If you use a washer, it would go on the inside of the object behind attached, just under the bolt head. Don’t over-tighten the the bolt. Over-tightening can cause layers to separate and cause a crack by the nut.

Lego Base
This base attaches to a 2×8 lego brick. There is also a Lego grip.
These print without supports as two pieces each. You can superglue the two parts together easily by simply aligning the edges.
The reality of FDM-printed Lego parts is that they don’t fit nearly as well as actual lego bricks fit because the printer has an accuracy of about 1/3mm and the pieces are designed for an accuracy much, much smaller than that. It would work with a resin printer.
For an FDM printer you might need to scale up or down the part that attaches to lego bricks. The other part (the grip or base) must not be scaled or it won’t work with the tentacle system. In both models the part that attaches to the lego bricks is quick to print by itself so you can try a few different scales to see what works for your printer.
Specifications from: https://www.bartneck.de/2019/04/21/lego-brick-dimensions-and-measurements/

Fischertechnik Base
This base works with Fischertechnik components. There is also a Fischertechnik grip. This part lets you attach tentacles to a Fischertechnik model. For example, to hold a webcam using the camera grip.
These print as two pieces each. You superglue the two parts together to make a complete base or grip.
You might notice that there is no peg for attaching into the slots of Fischertechnik pieces. There are only slots on these Tentacle System parts. That is because the pegs would just break off. And, there is no slot on the ends. That is because both parts are radially symmetrical so you can just rotate it by 90º if you need a slot on the “side”.
The reality of FDM-printed Fischertechnik parts is that they don’t fit nearly as well as actual Fischertechnik parts fit because the printer has an accuracy of about 1/3mm and the pieces are designed for an accuracy much, much smaller than that. It would work with a resin printer.
For an FDM printer you might need to scale up or down the part that attaches to Fischertechnik bricks. The other part (the grip or base) must not be scaled or it won’t work with the tentacle system. In both models the part that attaches to the Fischertechnik parts is fairly quick to print by itself, so you can try a few different scales to see what works for your printer.

More Fischertechnik Bases
Over on Printables, Juh created his own remixes of these parts, and they are really cool and they print without supports and in one piece!
https://www.printables.com/model/772134-fischertechnik-tentacle-system-adapters

Pegboard Base
This base attaches to a pegboard hanger, or any cylindrical object up to 20mm in diameter.


Pill Bottle Weighted Base
This component screws into a 48mm pill bottle. Fill it with sand or water for a weighted base.

Altoids Box Camera Kit
This kit includes a baseplate that fits inside an Altoids box along with parts needed to create a camera or webcam stand.
In addition to the base, there is a 75mm straight extension and a ¼” threaded grip to hold a light camera or webcam.
There is an optional holder for SD Cards. The SD Card holder clips into the base, but you might need to superglue it in place.
You can install a couple of optional 6x2mm neodymium magnets to help hold the base in the box.
The camera grip is tall enough that there is a circular hole in the baseplate so it will fit inside the box and so it doesn’t rattle around loose inside.
There are two holders to support the 75mm extension so it doesn’t rattle around inside.


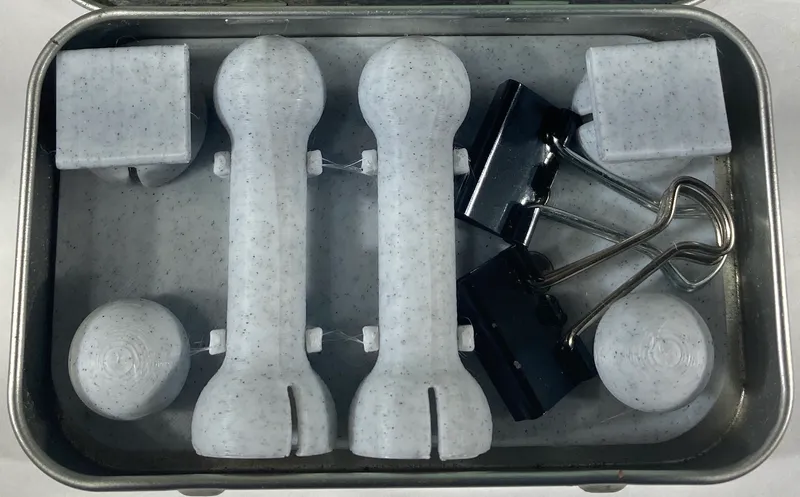
Altoids Box Soldering Stand
This kit includes a baseplate that fits inside an Altoids box along with parts needed to create a soldering stand.
In addition to the base, there are two 40mm straight extensions and two small 90º binder clip grips. These can hold objects and wires to be soldered without transferring much heat to the printed parts.
All the parts fit neatly in an Altoids box and stay in place even if the box is open and held upside down.
Parts Needed
- Two 6x2mm neodymium magnets
- Two small binder clips
- One Altoids or similar sized box (Newman’s Own mint boxes also work)
Printing
You can either print the full set or print the parts individually, for example if one gets lost or damaged or a print fails after some parts are completed.
You will need:
- One baseplate
- Two each of all other parts
If you slice it yourself I recommend 3 perimeters, 20% infill and all parts except the base need a 5mm brim.
PLA works fine, but don’t lever the pieces apart or you will break one side of the cups. Pull the pieces straight apart.
Assembly
You install a couple of 6x2mm neodymium magnets to hold the two small binder clips.
You will need to superglue the cups onto the binder clip grips. They align easily because of a circular indent.


Once the grips are glued, they snap onto two raised circles on the base.

To use the kit push the extensions onto the balls in the base and push the grips onto the tops of the extensions. Slide the binder clips into the slot in the printed grips.

When you’re done pull the extension out of the box by pressing on the base and pulling straight up. Pull the grips straight off the extensions and remove the binder clips. Push the printed grips onto the raised discs that secure them. Push the extensions into their holders. Position the two binder clips over the magnets in a cross pattern.
Use
When assembled as a stand, the two grips can be positioned in any orientation and can lean over the side of the box so dropped solder lands outside the base. Because the box is steel it can be attached with a magnet to a non-level workspace or anywhere a solder joint is needed. The magnets in the base also help prevent the stand from falling out of the box when it isn’t level.
This kit is compatible with all the other Tentacle System grips.


Display Top Base & Webcam Mount
This kit includes a base that sits on top of almost any display. It has a chain of links that hang down over the back of the monitor as a counterweight to the webcam. The chain ends in a cup that holds a AA (or LR6) battery.
The top has five different attachment points for displays of different thicknesses. The top covers only the top 5mm of the display, usually less than the border width around the screen.
You don’t need to use all of the links in the chain, or you can add more if needed. This kit serves as a base for any of the various Tentacle system components, so with this you can attach anything to the top of your display for which there is a suitable grip.
You’ll need to glue two parts together to finish the top piece. The smallest piece points in the opposite direction from the ball on top. It serves to hook onto the front edge of the monitor.

