Different ways to customize and improve your spool rotator.
There are a few different kinds of customizations you could try. I haven’t tried all of these: some of them might not work. But, unless you somehow defeat the torque limiting feature of the spool rotator, the only way you can hurt your printer with it is to drop it on your printer or drop a spool on your printer while you are swapping spools.
Speed Customizations
The various pulleys give you a lot of choices from very slow to certainly much too fast; however, because the magnets will slip when the force is too high, speed capability beyond that point is moot. There might still be an advantage to achieving that maximum torque point sooner.
I like the 50mm top pulley with the small or smallest bottom pulleys because it rotates slowest, which is ideal when a print uses a lot of filament. Otherwise the color change is too fast.
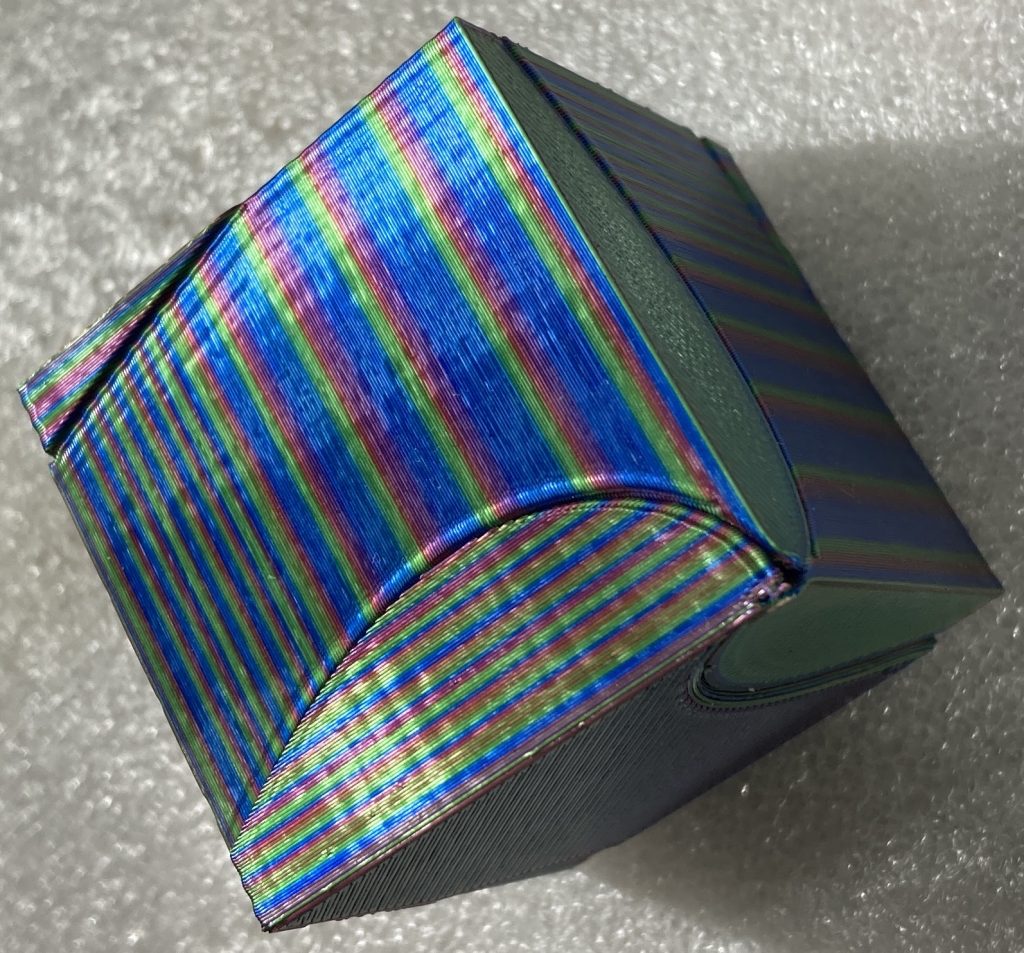
But, if you get the rotation slowed down and reduce the amount of filament used per layer (e.g. lightning infill or vase mode) then you can get some amazing effects like a single color cycle in an complete object:

The difference between the two prints above is that the top one is 15% gyroid infill with the default top and bottom pulley sizes. The bottom one is a vase mode print with a 50mm top pulley and the small bottom pulley.
The same 50mm top and small bottom pulley produced the vase mode print below. I think the rotator got stuck about 2/3 of the way through the print. But, perfectly predictable isn’t my goal for something whose very nature is to add something artistic. I am intending to capture chaos and make art with it.

Spool Change Customizations
My original design attempted to provide a quick-change mechanism for spools. That got very hard very fast, especially because at that point I had not actually gotten anything to work and the models for some of the parts were intrinsically unprintable.
The idea was to customize the arms so the spool could be mounted on an 8mm threaded rod complete with its flanges, and simply slide into place. What got hard was driving the mechanism from that arrangement. Gears, magnets, friction: there are ways to make it work, of course. But until someone designs a quick-change mechanism, the spools will have to be changed by partial disassembly. Here are instructions:
Ideas for changing spools:
- Quick Change for Spools
- Quick Change for Pulleys without removing the spool
- Eliminate the rubber band without creating an even more onerous way to transfer energy (more friction, more complicated to set up or make)
- Support two spools, one with filament secured, to make spool changes less needed
- Support small spools, like the 100g spools I use with the spool spinner.
Magnetic Gear Customizations
- Stronger magnets
- Bigger CMPG (flat magnet gear attached to shelf) and whatever else it takes to make that work.
- Does it work better if the magnets are a little closer or a little farther apart? I don’t know. I spaced them based on what I thought made sense.
- A ratchet that prevents it from going backwards, but it needs to automatically adjust to the direction of spool rotation (which is determined when the spool is mounted)
- Adjustable torque limiter
Other Customizations
- A better belt than a rubber band
- A different way to transfer force from spool rotation to the magnetic gear.
- A way to accommodate different sized spools (aside from different sized hub holes which the Spool Flange Sleeves address nicely.)
- Figure out a way to easily and safely turn on and off rotation. For example, one might leave it off for the first hour of a print and then turn it on when it reaches a critical spot, or turn it off at a given point.
- A way to make a small sound every time it advances one magnet position. Bonus points if it makes a different sound when it goes backwards.